
I Nearly caught myself on fire. For DIY guys, consider you are on the ground on your back under a floor jacked (and hopefully supported) vehicle with limited clearance to work.
And I am just assuming these vehicles listed in the thread title are all similar. They may not be. But I think I just experienced the first significant design flaw in my vehicle/ - which is how these fuel filters are designed, positioned, and installed -and what it takes to change them. The fuel filter on my 2004 Chevy Tahoe is placed in-line between the tank and the engine and located just about under the driver seat. It has a compression fitting on the rear connection, and a push-in type tube connection on the front connection. A male union extending out from the filter front side and is attached by being pushed up into the fuel line coming off to the engine. That male extrusion is held in place inside the fuel line by expansion clips inside the line female side that you have to slide a ring shaped tool up in to get them to release so you can back the line off the male front side extension. The idea is to insert the ring tool, push the front line up onto that ring tool somewhat to expand the internal clips in the female connector, while at the same tile backing the whole contraption off the male protruding tube coming off the front side of the filter...
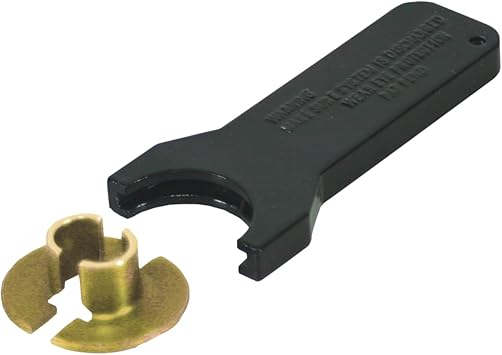
GMAC Created this where the line locks in too close to the fuel filter body and thus you have to use a "Low profile filter removal tool" to slide up in there. Which is a plastic ring sleeve of sorts which must be about 1cm in length maximum.
The long and short is you will wind up under there trying to wedge that PLASTIC ring tool up in there with a METAL screw driver like some kind of dumb monkey. Especially if you go to Autozone and buy their generic filter removal kit stated to work on these model vehicles, as it does not even come with any type leveraging handle to push the removal ring up in the front fuel line connection insert area.
WELL - My screw driver slipped and sparked and I guess I got lucky that the spark was not hot enough. Because my arm was soaked in gasoline and there was a pan of fuel laying next to me that I had just drained the remaining fuel from the line in after detaching the rear side filter compression type connection from the line.
It may even turn out that all I had to do was put the plastic removal ring in place around the line and and then push the forward fuel line backwards onto the filter and never have used a screwdriver. But the whole area is tight and releasing the body retaining bolt on the fuel filter strap appears to do little to free up the current installed filter for better handling. Its also easier said than done due to lack of space between the fuel filter and the front line female slip on connection. These "SLIP ON RING REMOVAL TOOLS" do not exactly just line up and slide in either. So you wind up with a screwdriver attempting for force the tool up into the female line end just to get it started.
I honestly DO NOT THINK that my low profile ring tool even went far enough up in the female front line connection to spread the internal prongs. Most likely they just finally gave way to the force of my wrench I used as a lever. And there is no way a longer ring tool would have fit in there. So I dont know I doubt there is an aftermarket tool out there that actually works right for this job....
The long and short is that by then and after my near arm kindling, I had the plastic ring tool somewhat worked up in there enough to eventually then get a wrench between the filter and the ring tool to use as a leverage pry arm and just brute forced it off. The internal clamp locks onto the original filter with a 4-prong metal clip that sits up in the female front line end. I guess I had at least two of them compressed back and the force of the wrench just stripped the other two forward. I DO NOT THINK the metal clip is intended as part of the fuel line and to stay in the fuel line female connector by intended design. I would speculate the female coupling is standard and the 4-prong clip is technically part of the original filter unit. No sweat though as the new filter comes with a new retention clip already on the male end and it is made to hold that line up in that female connection once you snatch than old inner 4-prong clip out.. NOTE new plastic one ONLY HAS TWO PRONGS and not four. The new male filter end neck may have even been longer than stock to get more space for future changes, but I was so pissed I can't say for sure because I honestly don't know what happened to the filter I removed...
The PROBLEM is due to BOTH GMAC CHEVY Vehicle design as well as poor aftermarket fuel filter removal tools out there from sale. And IT IS A GMAC Problem because your "normal" fuel filter removal tools WILL NOT FIT to get up in there and get a fuel filter off... And I mean who knows, perhaps GMAC has an entire procedure devoted to this that includes a custom dealer tool and that begins with back blowing all the remaining fuel out of that front line section from the Fuel rail pressure connector after first releasing the rear filter compression fitting. But you just don't stop to consider all this when you are just changing out some "Stupid old fuel filter"...
Live and learn and hope you don't die. I am just doing my part sharing so anyone that reads this won't...
And I am just assuming these vehicles listed in the thread title are all similar. They may not be. But I think I just experienced the first significant design flaw in my vehicle/ - which is how these fuel filters are designed, positioned, and installed -and what it takes to change them. The fuel filter on my 2004 Chevy Tahoe is placed in-line between the tank and the engine and located just about under the driver seat. It has a compression fitting on the rear connection, and a push-in type tube connection on the front connection. A male union extending out from the filter front side and is attached by being pushed up into the fuel line coming off to the engine. That male extrusion is held in place inside the fuel line by expansion clips inside the line female side that you have to slide a ring shaped tool up in to get them to release so you can back the line off the male front side extension. The idea is to insert the ring tool, push the front line up onto that ring tool somewhat to expand the internal clips in the female connector, while at the same tile backing the whole contraption off the male protruding tube coming off the front side of the filter...
GMAC Created this where the line locks in too close to the fuel filter body and thus you have to use a "Low profile filter removal tool" to slide up in there. Which is a plastic ring sleeve of sorts which must be about 1cm in length maximum.
The long and short is you will wind up under there trying to wedge that PLASTIC ring tool up in there with a METAL screw driver like some kind of dumb monkey. Especially if you go to Autozone and buy their generic filter removal kit stated to work on these model vehicles, as it does not even come with any type leveraging handle to push the removal ring up in the front fuel line connection insert area.
WELL - My screw driver slipped and sparked and I guess I got lucky that the spark was not hot enough. Because my arm was soaked in gasoline and there was a pan of fuel laying next to me that I had just drained the remaining fuel from the line in after detaching the rear side filter compression type connection from the line.
It may even turn out that all I had to do was put the plastic removal ring in place around the line and and then push the forward fuel line backwards onto the filter and never have used a screwdriver. But the whole area is tight and releasing the body retaining bolt on the fuel filter strap appears to do little to free up the current installed filter for better handling. Its also easier said than done due to lack of space between the fuel filter and the front line female slip on connection. These "SLIP ON RING REMOVAL TOOLS" do not exactly just line up and slide in either. So you wind up with a screwdriver attempting for force the tool up into the female line end just to get it started.
I honestly DO NOT THINK that my low profile ring tool even went far enough up in the female front line connection to spread the internal prongs. Most likely they just finally gave way to the force of my wrench I used as a lever. And there is no way a longer ring tool would have fit in there. So I dont know I doubt there is an aftermarket tool out there that actually works right for this job....
The long and short is that by then and after my near arm kindling, I had the plastic ring tool somewhat worked up in there enough to eventually then get a wrench between the filter and the ring tool to use as a leverage pry arm and just brute forced it off. The internal clamp locks onto the original filter with a 4-prong metal clip that sits up in the female front line end. I guess I had at least two of them compressed back and the force of the wrench just stripped the other two forward. I DO NOT THINK the metal clip is intended as part of the fuel line and to stay in the fuel line female connector by intended design. I would speculate the female coupling is standard and the 4-prong clip is technically part of the original filter unit. No sweat though as the new filter comes with a new retention clip already on the male end and it is made to hold that line up in that female connection once you snatch than old inner 4-prong clip out.. NOTE new plastic one ONLY HAS TWO PRONGS and not four. The new male filter end neck may have even been longer than stock to get more space for future changes, but I was so pissed I can't say for sure because I honestly don't know what happened to the filter I removed...
The PROBLEM is due to BOTH GMAC CHEVY Vehicle design as well as poor aftermarket fuel filter removal tools out there from sale. And IT IS A GMAC Problem because your "normal" fuel filter removal tools WILL NOT FIT to get up in there and get a fuel filter off... And I mean who knows, perhaps GMAC has an entire procedure devoted to this that includes a custom dealer tool and that begins with back blowing all the remaining fuel out of that front line section from the Fuel rail pressure connector after first releasing the rear filter compression fitting. But you just don't stop to consider all this when you are just changing out some "Stupid old fuel filter"...
Live and learn and hope you don't die. I am just doing my part sharing so anyone that reads this won't...
 GOOD GRIEF and back to square one for the next filter change.